Installation
After this installation tutorial, you will have the user tracking container script up and running and are ready to create your first tracking request or use an existing integration.
By just installing the user tracking container script, no tracking requests are sent to Linkster yet.
Tracking requests must be either developed by you or are sent automatically by using a Linkster tracking integration.
As mentioned in the introduction, a key point of the Linkster tracking is to send the EMID parameter with every tracking requests, if available.
Since the EMID is only passed once per link click to the target URL (your site or web store), it is important to store the EMID till a tracking request is fired.
To handle this situation, Linkster created a lightweight script tag that must be implemented on every page of your site/web store.
Due to data protection reasons, you must ensure that the script only gets loaded if the user gave his consent.
For this script to work properly, you need to automatically load the script after the consent was given, without the user having to reload the page himself.
Include this script tag on every page:
<script src="//trck.linkster.co/trck/etms/eatms.js?campaign_id=YOUR_CAMPAIGN_ID"></script>
Make sure to replace YOUR_CAMPAIGN_ID with the campaign ID you got from your Linkster contact.
Examples
Now follows a list of integration examples for popular technologies. Please note that the shown examples don’t include the necessary cookie consent check mentioned above.
Shopify
To include the user tracking container script on every site of your Shopify store, the easiest way to do this is by adding it to the theme.liquid file.
You can alternatively implement the user tracking container script over Google Tag Manager, if your Shopify store uses it.
- Navigate to your Shopify store admin. You can reach it under your-shop-domain.com/admin
- From there in the side menu under "Sales Channels" click on "Online Store"
- On the newly opened page, under the section "Current theme" click on the dropdown button called "Actions" and click on the option that says "Edit code"
- Now search for a file called
theme.liquidand open it by clicking on it - You can now insert the user tracking container script before the closing body tag (
</body>) - Click on save
You now have successfully installed the user tracking container script on your Shopify store.
WooCommerce (WordPress)
To integrate the user tracking container script with WordPress, the only thing you need to do is to insert the user tracking container script before the closing body tag (</body>) in your theme’s footer.php file.
You can alternatively implement the user tracking container script over Google Tag Manager, if GTM is installed on your WordPress site.
Google Tag Manager (GTM)
Including the user tracking container script with GTM is straight forward. All you need to do is to create a new tag with the "All Pages / Page View" trigger.
- Open the GTM homepage of the project you want to include Linkster tracking for
- Click on "Tags" in the side menu
- Create a new tag by clicking "New"
- Click on "Tag Configuration", choose "Custom HTML" and past in the user tracking container script from above
- Click on "Triggering" and chose "All Pages"
- Give the tag a memorable name like "Linkster – User Tracking Container"
- Save the tag
- Deploy the tag by clicking "Submit" and then "Publish"
You now have successfully implemented the user tracking container script with GTM.
Testing if everything works
You can test if the user tracking container script is successfully implemented by check if the script is being loaded with your browser’s dev tools.
-
In chrome, open a new incognito window and navigate to your site/web store
-
Then open the dev tools by making a right click somewhere on the page, then click on
Inspect -
Go to the "Network" tab, and then select "JS" in the filter bubbles
-
Next, in the top left corner of your browser do a right click on the reload button and click on "Empty cache and hard reload"
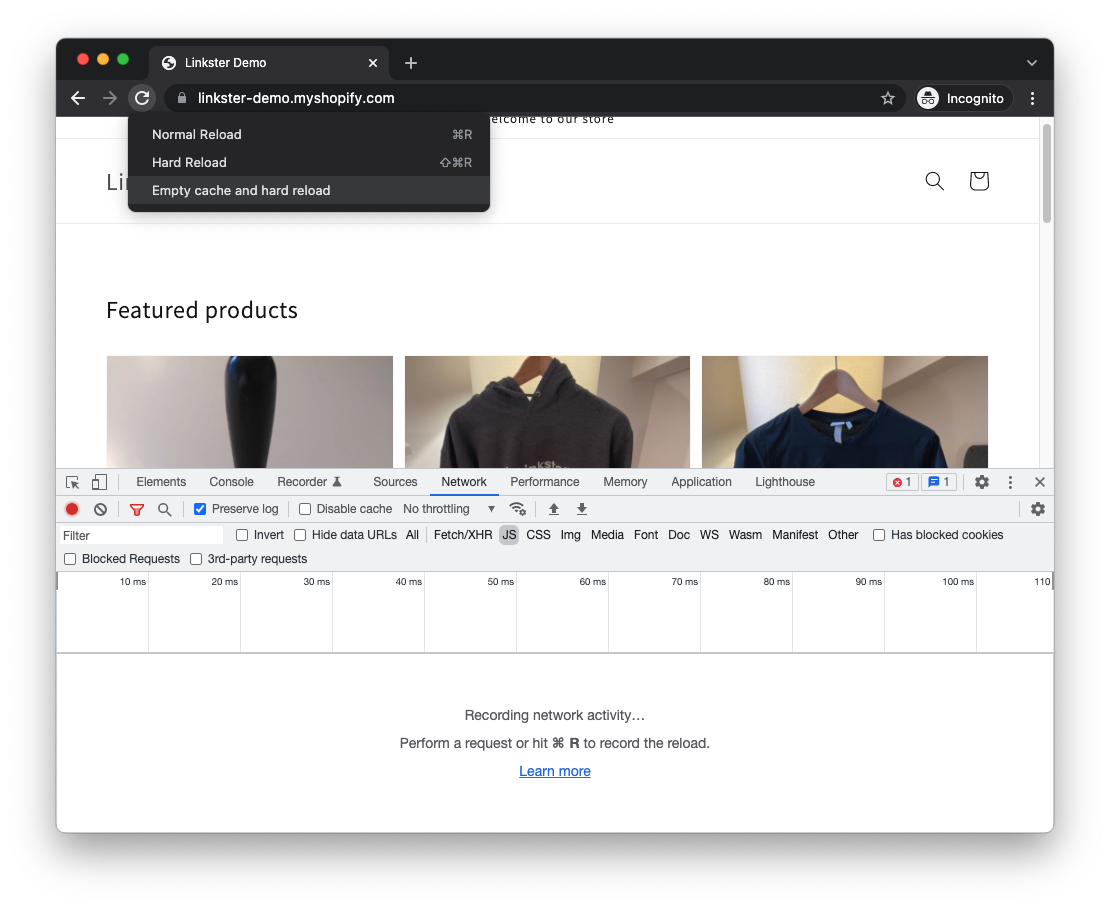
-
After the page has finished loading, you should see a script called
eatms.js?campaign_id=XXX
Repeat the steps from above for a couple of different subpages to ensure that the script is loaded on every page.
Next step
To actually send tracking requests to Linkster the next step is to build and send Lead conversion tracking and/or sale conversion tracking requests.
This can either be done by developing your own requests or by using an already existing Linkster integration.